What Is PCR7 Binding
PCR7 Binding is a technology that helps Windows usersencrypt hard driveson their computers.
It is different from Bitlocker.
Bitlocker is used for Windows 11/10 Pro, Enterprise, or Education edition.
Windows 11/10 Home users cannot use Bitlocker because Windows 11/10 Home does not support it.
Instead, they can use the PCR7 Binding technology to encrypt their drives.
PCR7 Binding System Requirements
The PCR7 Binding technology requires some hardware specifications.
If not, you will see a message in System Information that PCR7 Binding is not supported.
To do this, follow the steps below:
Step 1:ClickWindows Searchand typesystem information.
Step 2:Now, right-select theSystem Informationapp and selectRun as administrator.

ClickYeson the UAC prompt.
Step 3:In the System Information system, make sureSystem Summaryis selected in the left pane.
Step 4:If your gadget supports PCR7 Binding, you will seePCR7 Configuration Binding Possible.
If not, you will seePCR7 Configuration Binding Not Possible.
Step 5:Then check whether you could enable equipment Encryption.
To do that, scroll down the System Information page and findDevice Encryption Support.
# 1.
TPM Support
A TPM is a chip designed to provide hardware-based and security-related functions.
It stores encryption keys to provide endpoint security for devices.
TPM is another requirement for unit Encryption on Windows devices.
So, test whether your gear has a TPM chip installed.
Step 1:Press theWin + Rkey to open theRundialog.
Then typetpm.mscin it and pressEnter.
Step 2:Then the Trusted Management Module Management will launch.
If you see the message saying The TPM is ready to use, you have it.
However, you may still need to turn on the TPM in theBIOS setup utility.
# 2.
Change the BIOS Mode to UEFI
As you know, there are 2 different BIOS modes UEFI and Legacy.
If you want to use gadget Encryption, you oughta set the UEFI as the BIOS mode.
If your BIOS mode is Legacy, you should change it to UEFI.
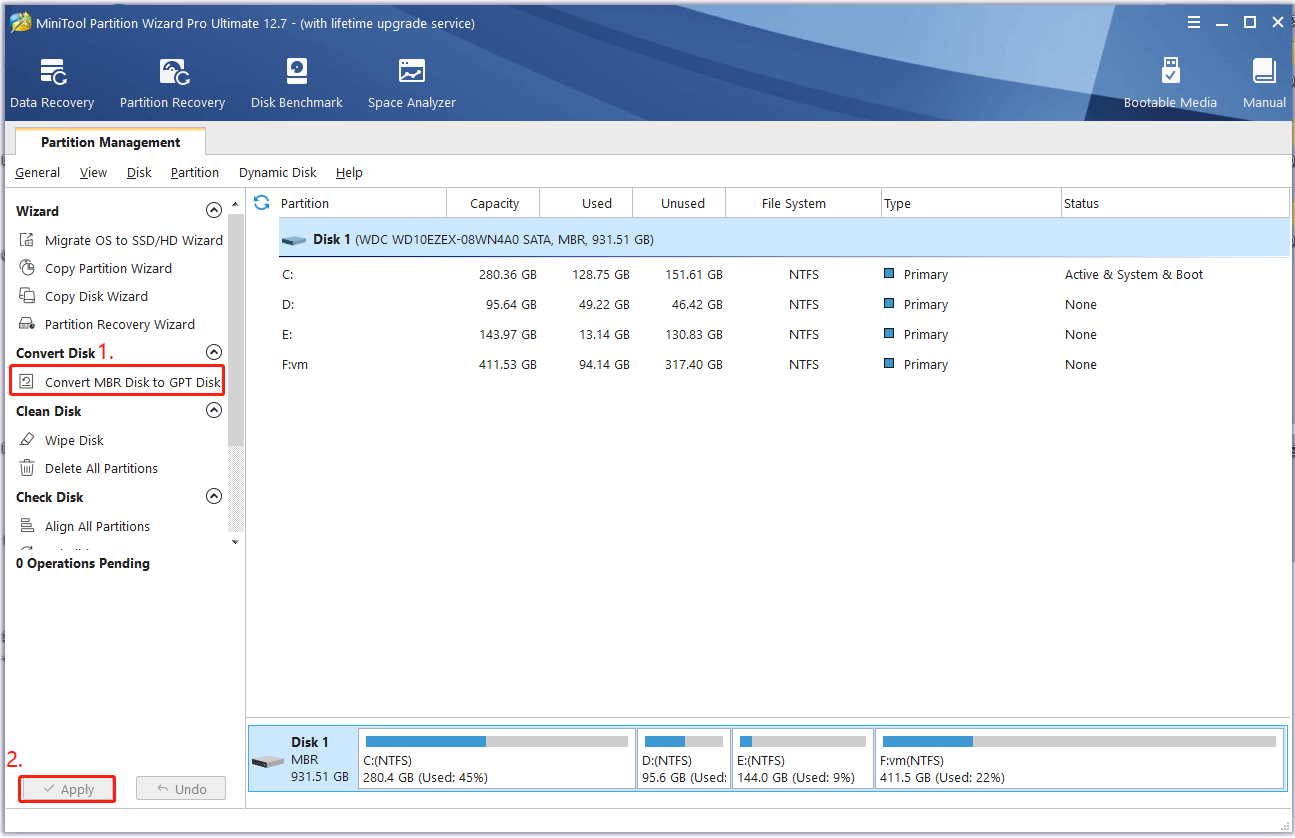
Then click onOKto confirm this change.
Step 2.Click onApplyto execute the pending conversion.
Now, you better change the BIOS mode from Legacy to UEFI.
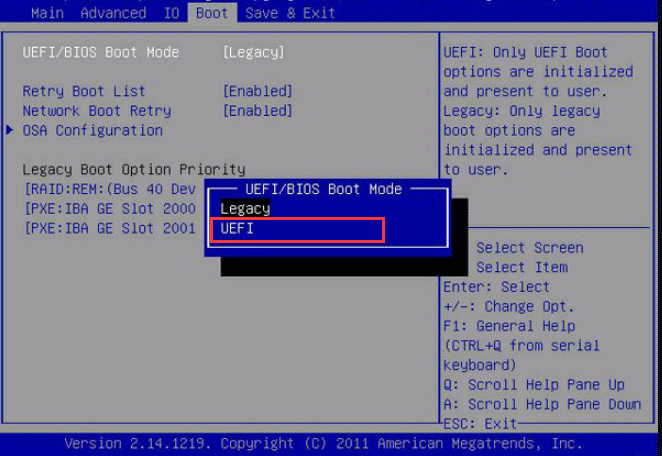
Step 2:Navigate to theBoottab by pressing the right arrow key.
Step 3:Select theUEFI/BIOS Boot Mode, and pressEnter.
Step 4:In the pop-up window, select theUEFI Boot Modeby pressing the up and down arrow keys.
Then press theF10key andEnterto save the change and exit the window.
The process may differ depending on your motherboard manufacturer.
If you cant find the UEFI option, you’re free to check your manufacturers website.
Once done, start your gear and see if the PCR7 is not supported issue gets fixed.
It enables Windows devices to boot using only software trusted by the OEM (Original Equipment Manufacturer).
To fix this, you oughta enable Secure Boot in your PCs BIOS menu.
Before that, you’re able to verify whether Secure Boot is enabled or disabled in your system.
Heres how:
Step 1:Open theSystem Informationwindow again.
Step 2:SelectSystem Summaryfrom the left panel and check theSecure Boot Statein the right panel.
If it isOn, skip to the next step.
If it isOfforUnsupported, you should probably enable it in BIOS.
To do this work, proceed with the following steps.
Then your PC will restart right now andenter into BIOS.
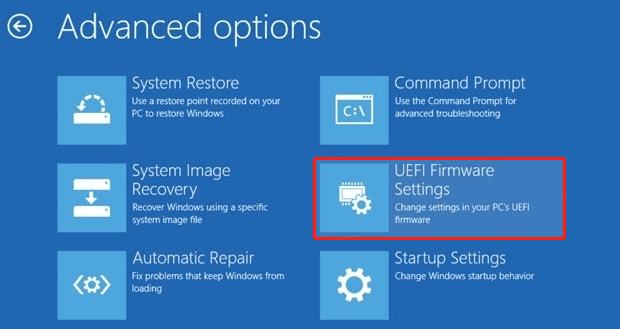
Step 4:SelectTroubleshootand thenAdvanced optionsin theAdvanced startupmenu.
Step 5:SelectUEFI Firmware Settingsand clickRestartto boot your machine into UEFI BIOS.
The steps to enable Secure Boot may vary for different motherboards.
If you cant find the option, check out the manual provided by your manufacturer.
# 4.
Modern Standby Support
Modern Standby is also known as S0 Low Power Idle Mode.
If you want to use machine Encryption on your system, you should enable Modern Standby mode.
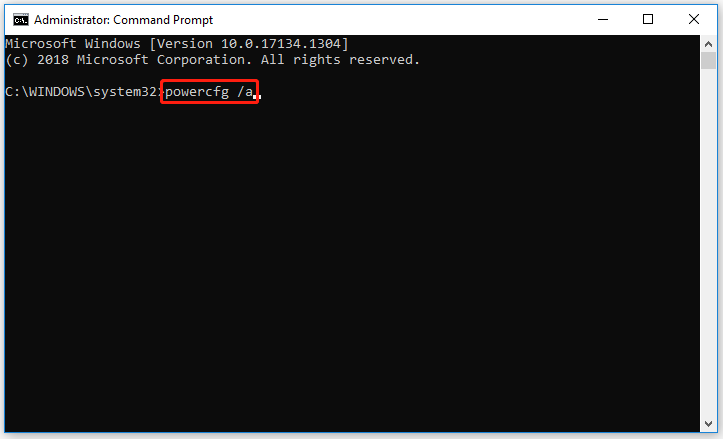
Then typecmdto locateCommand Promptand right-choose it to chooseRun as administrator.
Step 2: Typepowercfg /aand pressEnter.
In this case, it’s possible for you to use third-party software to encrypt your hard drive.
VeraCrypt and DiskCryptor are some powerful disk encryption software for Windows devices.
The PCR7 is not supported when I upgrade to Windows 11.
Fortunately, the troubleshooting methods helped fix the error.
The top 4 methods have been illustrated in this post.
