All versions of Windows come with a useful function calledSleep mode.
This mode brings your system to an idle state and conserves the systems battery and resources.
But sadly, for some users, the Sleep mode feature has stopped working on their Windows 11 PC.
According to them, their system doesnt enter Sleep mode when they keep it idle for some time.
They also mentioned that the Sleep mode stopped working after installing a system update.
In this in-depth fixes guide, weve shared somepossible workaroundsto fix the Sleep mode not working issue.

Why Is the Sleep Mode Not Working in Windows 11?
Reboot Your PC
You might have already tried this solution several times after the occurrence of this issue.
Restarting the PC will refresh the entire PC, including the data and apps.
Once your PC has been rebooted, leave it idle to check whether the Sleep mode works.
This isnt an assumption, but many users have found it.
For most users, it was their mouse causing this issue.
If unplugging the external unit doesnt eliminate the issue, you’re able to tryswitching the USB ports.
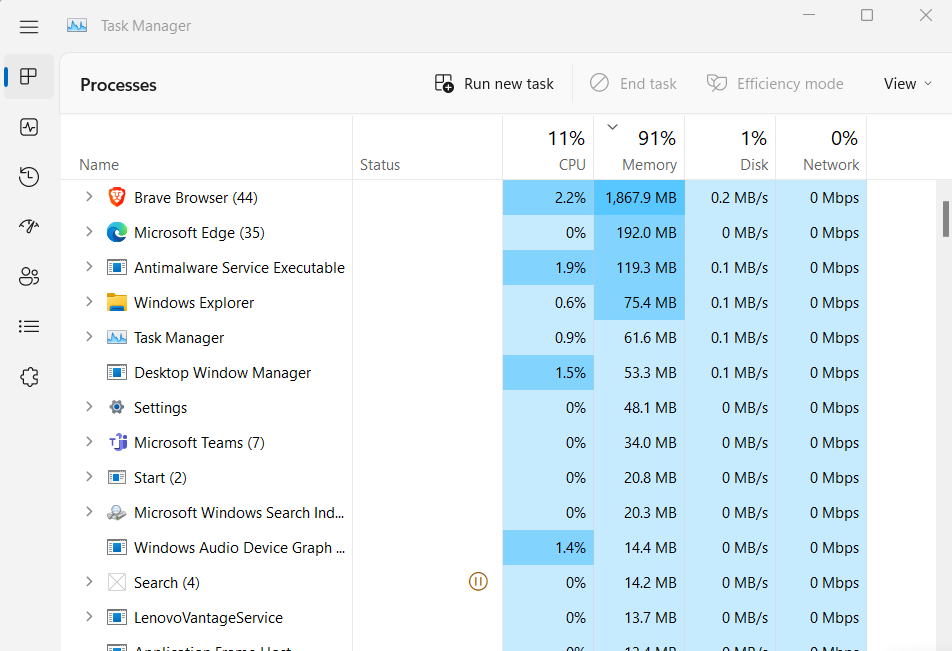
To check whether thats the case, we recommend youclose all the unnecessary programsrunning in the background.
For example, in our case, its showing this process, which is created by the Spotify app.
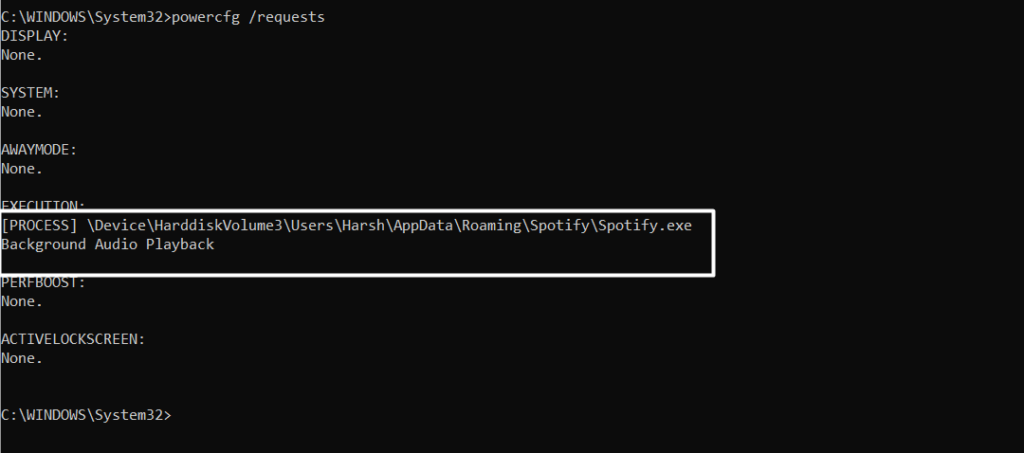
This will initiate the originated program on your PC, and youll be able to easily figure it out.
4.Once youve identified the program, openTask Managerusing theCtrl + Shift + Escshortcut and search for it.
5.Lastly, right-choose the program in theTask Managerand selectEnd taskfrom the right-click menu.

Do the same with other tasks that are causing the Sleep mode not working issue on your PC.
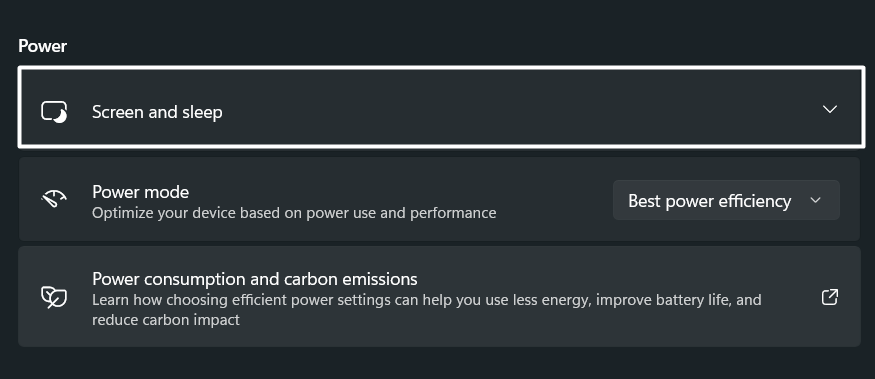
2.Once theSettings appis opened, move to thePower & batterysection and expand theScreen and sleepsection.
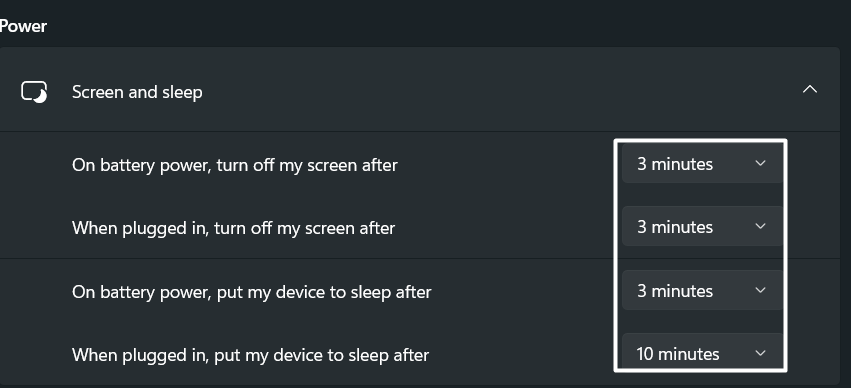
3.Lastly, in theScreen and sleepsection, double-check each option has a timer assigned to it.

If not, then assign a timer to each option.
Doing so will enable Sleep mode on your Windows 11 PC in seconds.
This is because viruses and malware make incorrect modifications to the systems parameters and disrupt its operation.

Due to this, we suggest youcheck your Windows PC for infectionsby running a quick virus scan.
2.Now, click onVirus & threat protectionunder theBest matchsection to launch the Malware Removal tool.
3.Then, click theQuick scanbutton in theCurrent threatssection to start the quick virus and malware scan.

If the scan finds some infected files on your PC, follow the on-screen instructions to remove them.
It could be the same in your case.
Due to this reason, we suggest you verify that theHybrid mode option is disabledon your Windows 11 PC.
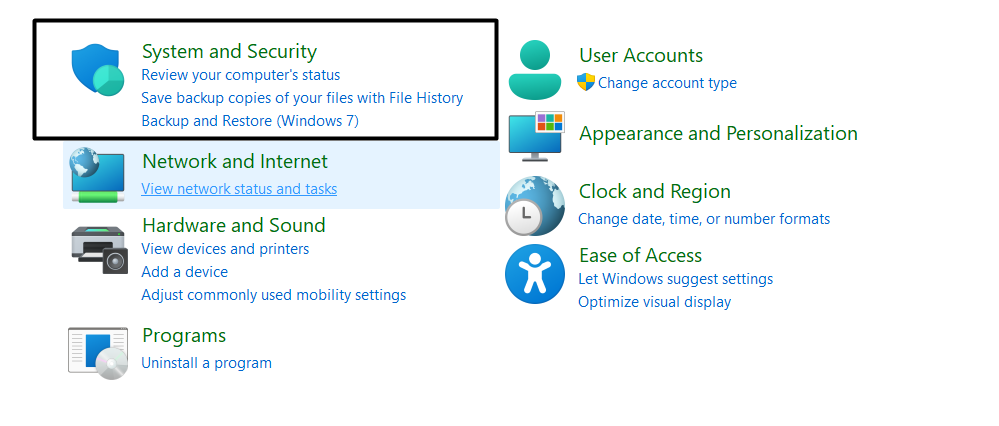
2.Now, choose thePower Optionsunder theSystem and Securitysection and select theChange power settingsoption.
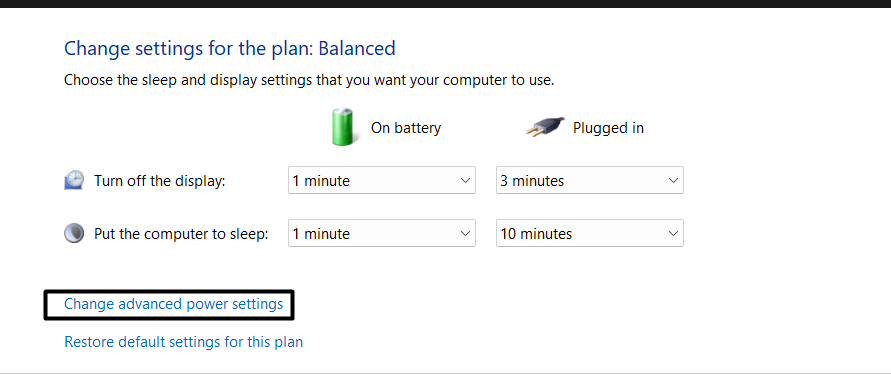
3.Then, hit theChange advanced power settingsoption onChange parameters for the plan: Balancedwindow.
4.Once thePower Optionspopup is opened on your Windows screen, search for theSleepoption and hit it.
5.After that, set theOn batteryandPlugged inoption toOffunderAllow hybrid sleepto disable Hybrid mode.
6.Lastly, click onApplyto save all the recent changes, and then click onOKto close thePower Optionsprompt.
After disabling the Hybrid mode on your Windows PC, check whether the Sleep mode is now working properly.

When you keep both functions switched on at the same time, none of the features function properly.
So, if youve enabled the Screen Saver option on your Windows 11 PC, we suggest youdisable it.
2.Next, click onLock screenon thePersonalizationwindow and then punch theScreen saveroption.

3.Once theScreen Saver Settingsprompt is opened, snag the(None)option from theScreen Saverdropdown.
After disabling the Screen Saver option in your Windows 11 PC, check whether Sleep mode is working properly.
These peripheral devices could be mice, keyboards, trackpads, etc.

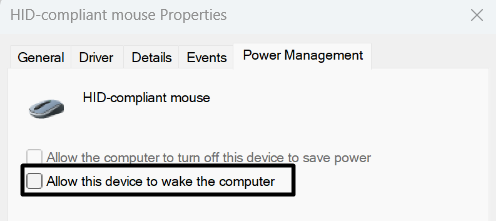
2.Once theDevice Managerprompt is opened, scroll to theMice and other pointing devicessection and expand it.
3.Now, right-click theHID-compliant mousedriver and select thePropertiesoption from the right-click menu.
4.Then, jump to thePower Managementsection and untick theAllow this equipment to wake the computerbox.
Once done, clickOKto save the changes and repeat the same steps on the keyboard and trackpad drivers.
Disable Wake Timers
Another possible reason behind the randomly waking up of your system is the wake timers.
2.Next, click onPower Optionsunder theSystem and Securitysection and click onChange plan configs.

3.Then, click onChange advanced power settingsonChange tweaks for the plan: Balancedwindow.
4.Once thePower Optionsprompt is opened, expand theSleepsection and then expand theAllow wake timerssub-section.
5.In the end, set both theBatteryandPlugged inoptions toDisabledunder theAllow wake timerssub-section.
Once youve disabled wake timers on your system, it shouldnt wake up randomly at different intervals.
Deactivate Fast Startup
While troubleshooting this issue, we found that the Fast startup can also cause this issue.
This is because Fast startup sometimes mistakenly closes Windows programs and services that help the system work properly.

It could be the same with the service that helps Sleep mode function correctly.
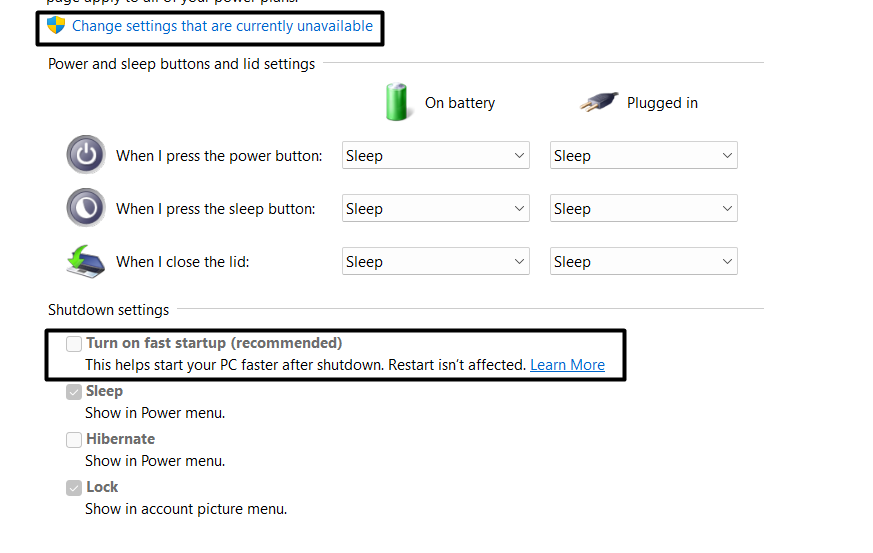
To check whether thats the same, we suggest youdeactivate Fast startupon your system.
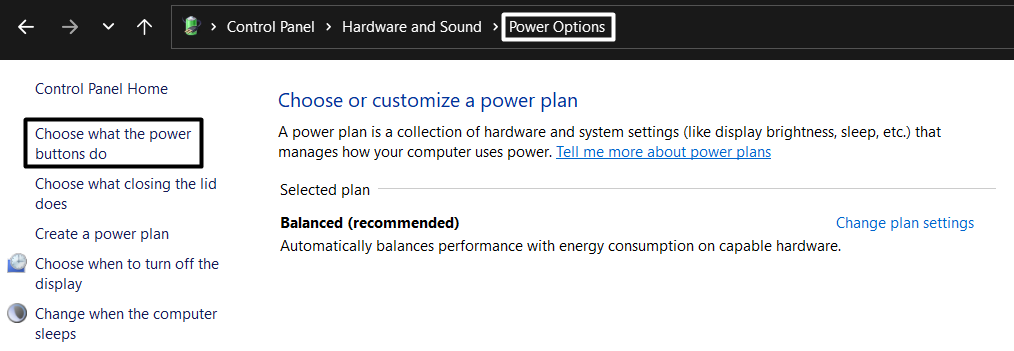
2.Next, click onPower Optionsand then choose theChoose what the power buttons dooption from the left sidebar.

3.Then, click onChange prefs that are currently unavailableat the top of theShutdown settingswindow.
4.Finally, uncheck theTurn on fast startup (recommended)box to deactivate Fast startup on your Windows PC.
If disabling it fixes the issue, then we suggest keeping it disabled to avoid issues.

They also added that enabling this option can fix the issue, as it did for them.
So, we also suggest the same to you.
3.Right-tap on theUSB Root Hub (3.0)driver under the same section and selectPropertiesfrom the right-click menu.

Microsoft regularly releases new updates to fix the issues with the system drivers.
It could be possible that they have already released updates for the systems display drivers to fix these issues.
Therefore, we suggest youcheck for new display driver updates and install themto eliminate the bugs with it.

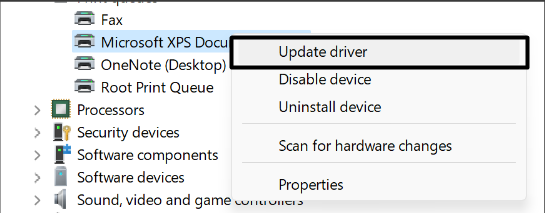
3.Select theUpdate driveroption from the right-click menu and select theSearch automatically for driverstile.
Itll now start searching for new updates for the selected display driver and install them automatically.
To check whether its true, we suggest you revert all your power plan configurations to default.

In some cases, this has fixed the issue with Sleep mode for many Windows 11 users.
Thus, we also suggest the same to you.
2.Under theSystem and Securitysection, click onPower Optionsand then click onChange power options.
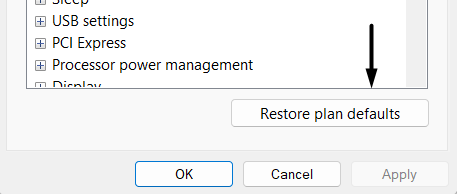
3.Then, press theChange advanced power settingsoption and then click theRestore plan defaultsbutton.
The Sleep mode should be working properly after factory resetting the power plan options.
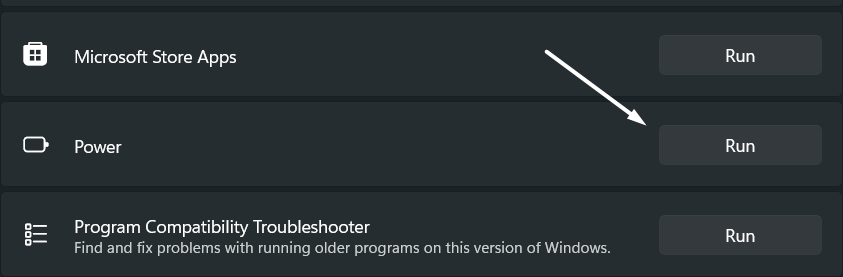
Many users have fixed the issue with Sleep mode by using the Power troubleshooter.

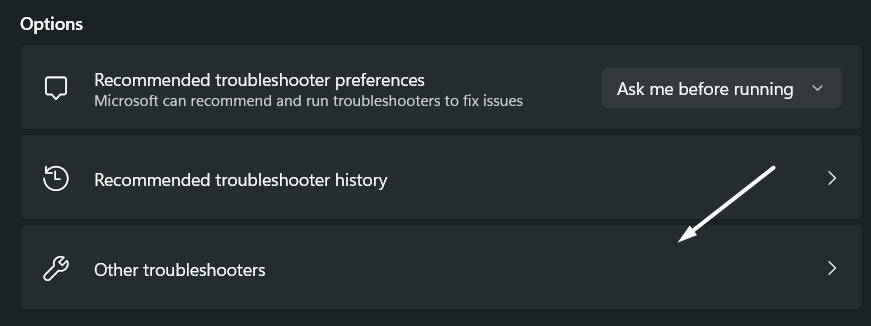
2.Now, click onOther troubleshootersto open theOther troubleshooterssection and search forPowerin theOtherssection.
3.Then, click theRunbutton next toPowerto start the power troubleshooting process and fix issues with the system.
1.Launch theSettings appon your Windows system and selectWindows Updatefrom the menu on the left.
3.If the scanning process finds some new updates to install, click theDownload & Install allbutton to install them.
Once your system is upgraded to the latest version, check whether the Sleep mode is now properly working.
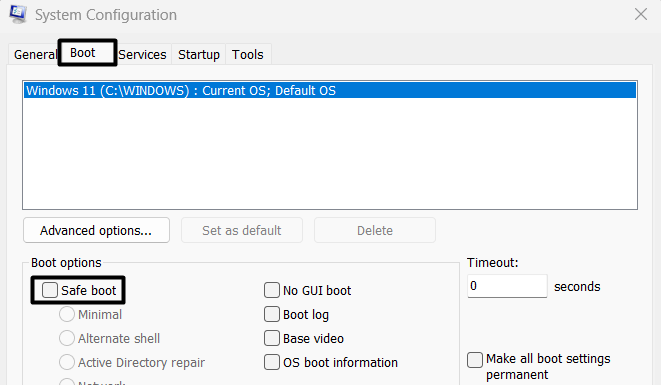
Whenever we start the system in Safe mode, it only starts with only essential Windows programs and services.
2.Then, jump to theBoottab and check theSafe bootcheckbox under theBoot optionssection to activate the Safe mode.
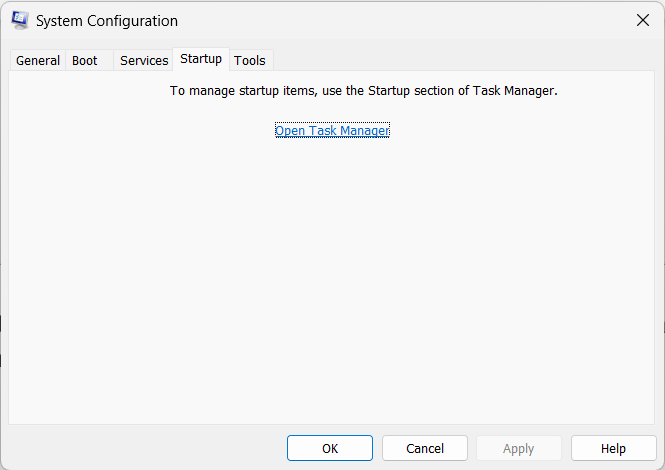
4.Next, move to theStartuparea and click onOpen Task Managerto open theTask Managerutility on the PC.
5.In the end,disable all non-Microsoft services under theProcessessection in theTask Managerutility.

After closing all non-Microsoft services, restart the PC and check whether the PCs Sleep mode is working.
If it fixed the issue, then a third-party was causing it.
FAQs
Why Sleep Doesnt Work in Windows 11?

Another possible reason behind this could be infected files in the system.
You canrun a quick virus scanon your Windows 11 PC and remove all the malware-infected files in one go.
How Do I Enable Sleep Mode in Windows 11?

2.Next, click onPower Optionsin theSystem & Securitysection to access your devices power plan parameters.
Why Did My Sleep Mode Disappeared?
In that case, you might tryupdating your systems display driversto fix the bugs in it.

Other reasons could be infected system files, incorrect power options, unnecessary running processes, etc.
How Do I Enable Sleep Mode in Bios?
Once entered, move to thePower Managementsection.
it’s possible for you to checkFix 4to know the exact steps to reach there.
Sadly, the same is happening with many Windows 11 users.
As per them, their PC doesnt go to sleep when they keep it idle.

We hope the listed workarounds helped you fix the issue in your case as well.
If yes, then let us know which of the mentioned fixes helped you fix it.