Skype is one of the most popular VoIP services used by millions of people around the globe.
But like other VoIP services, Skype also sometimes experiences issues in working properly.
For instance, many users recently said Skype isnt opening or keeps crashing on their Windows 11 PC.

So read ahead and deal with the Skype not working issue on your Windows 11 computer.
Why Is Skype Not Working in Windows 11?
There could be several reasons for Skype not working issue in Windows 11.

Thus, we suggest you try the same and check whether it fixes the issue.
2.Choose theRun as administratoroption from the search results to open it with admin rights.
Note:If the Run as administrator functionality isnt working for you, check out thisguideto fix it.

3.Once Skype is opened with admin rights, check whether its still crashing again and again.
Open Skype in Compatibility Mode
The Skype program on Windows can also behave weirdly because of some compatibility issues.
To fix those compatibility issues, we recommend you runSkype in compatibility mode.
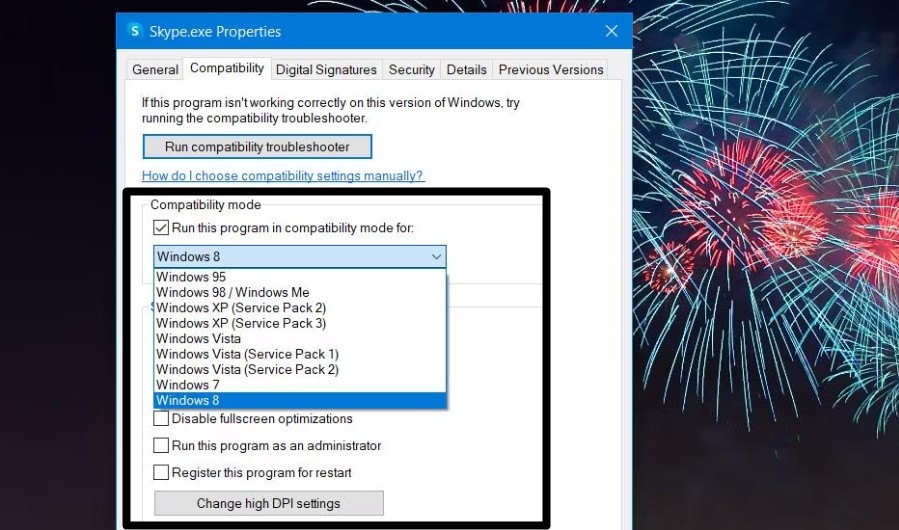
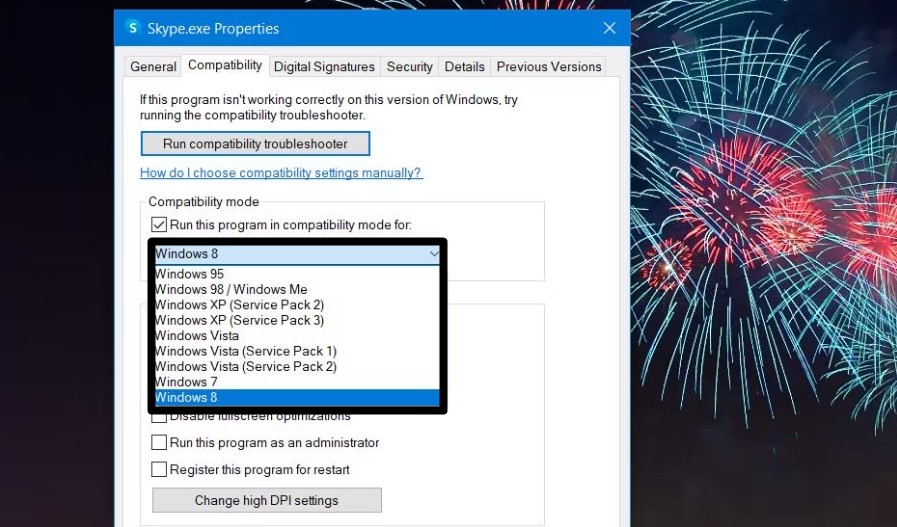
3.Move to theCompatibilitytab and tick theRun this program in compatibility mode for:checkbox.
4.Choose theWindows 8option from the dropdown menu in theCompatibility modesection.
5.In the end,click theApplybutton at the bottom of the prompt to save the recent changes.
So, use theAlt + F4shortcut and select theRestart optionfrom the dropdown menu.
Once its rebooted, check the issues status.
So try the same and check whether it fixes the problem with Skype.

Due to this, it wasnt opening or launching on the PC.
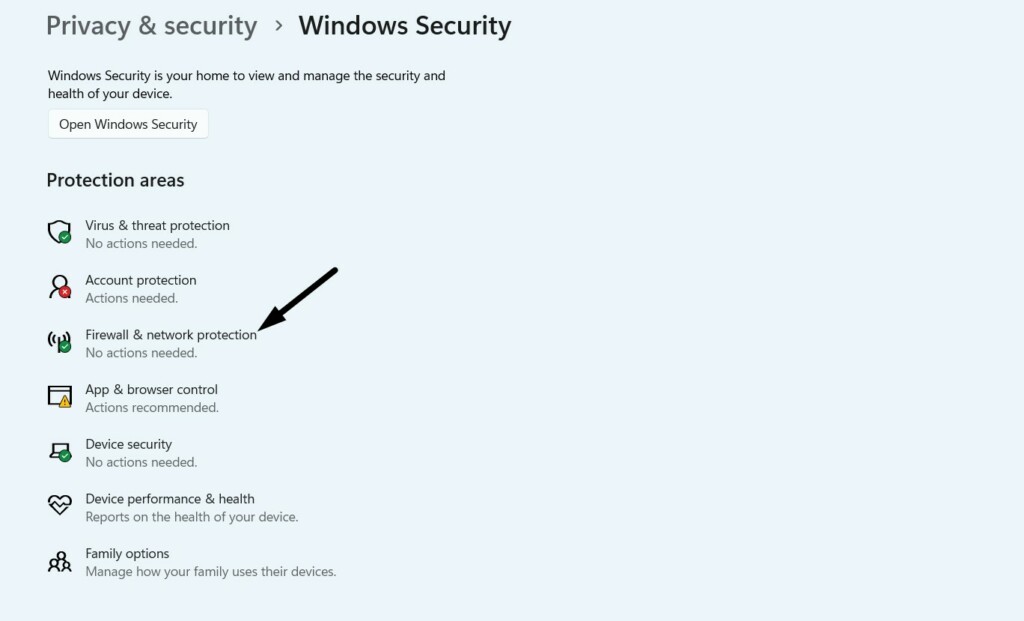
2.ClickWindows Securityin the next window and then selectFirewall & connection protection.
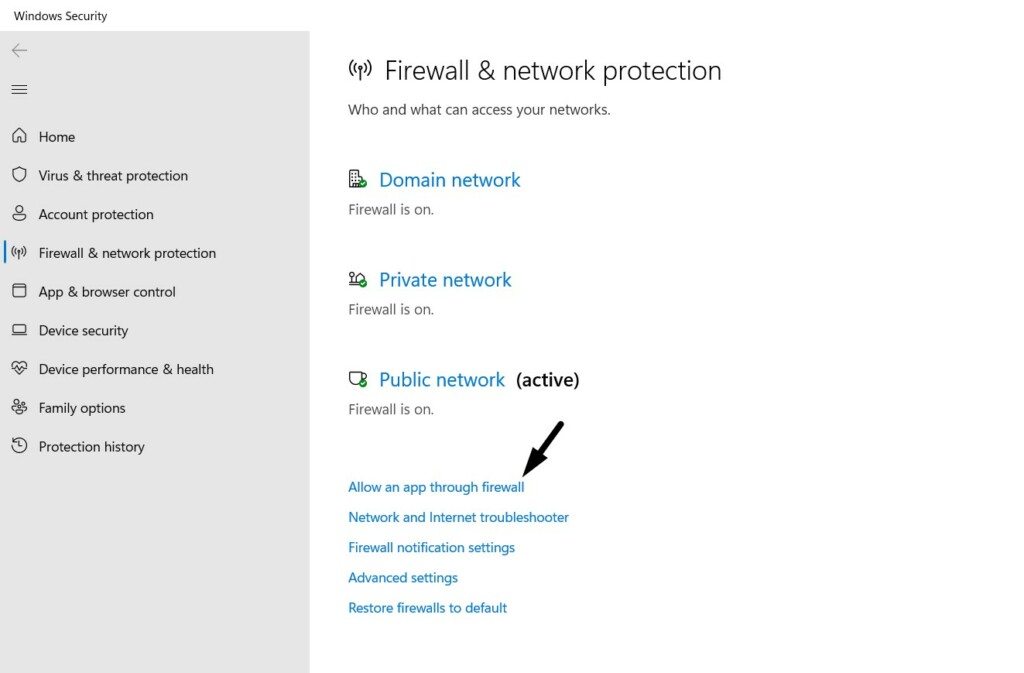
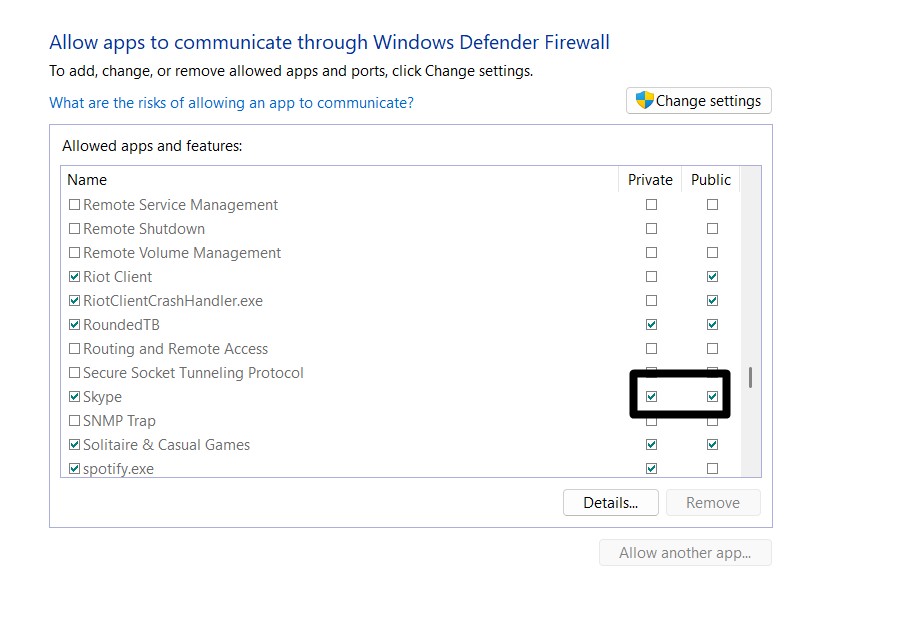
3.Click theAllow an app through firewalloption and then click theChange settingsbutton.
4.Search for theSkype programin the square box and then tick both checkboxes next to it.
5.Once done, click theOKbutton to save all the recent changes and then confirm the issues status.
Check your setup for Malware
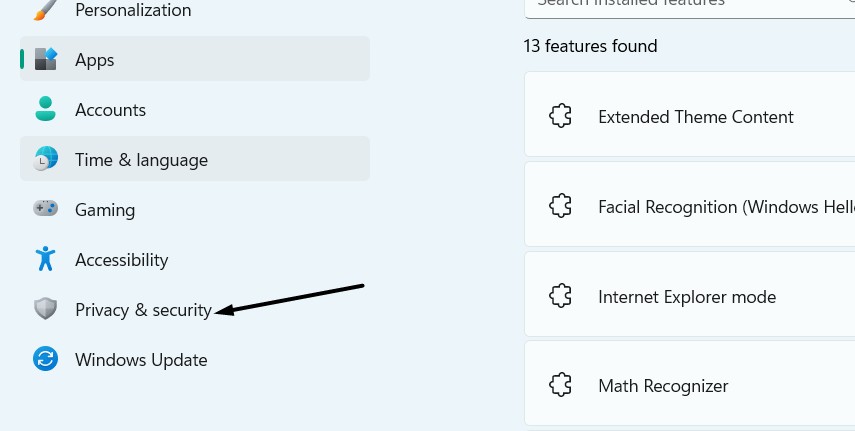
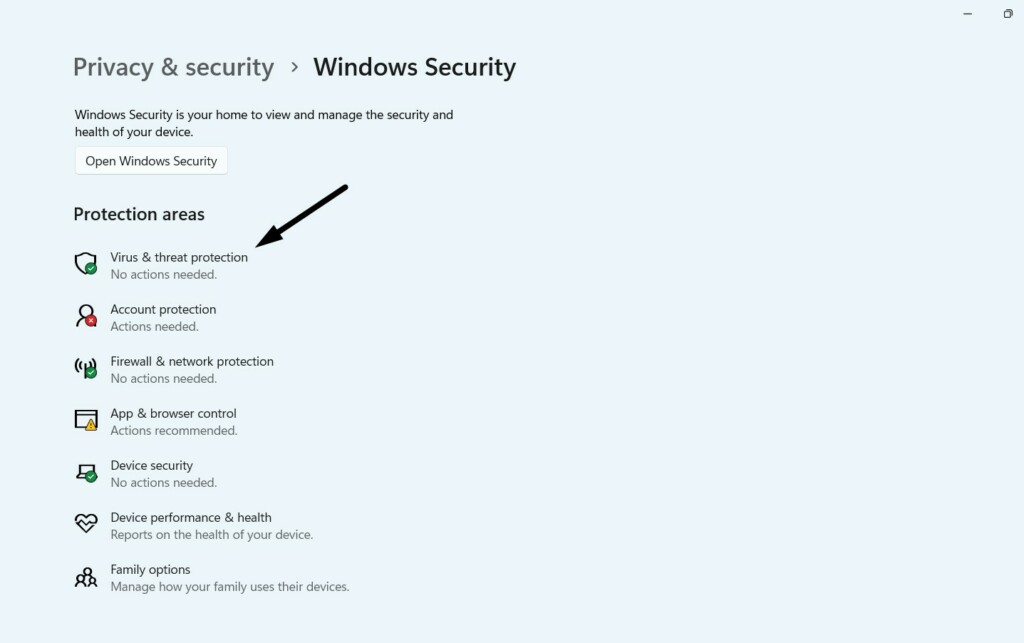
1.Launch theSettings appon your PC and choose thePrivacy & securityoption from the left.
2.Click theWindows Securityoption and then choose theVirus & threat protectionoption.
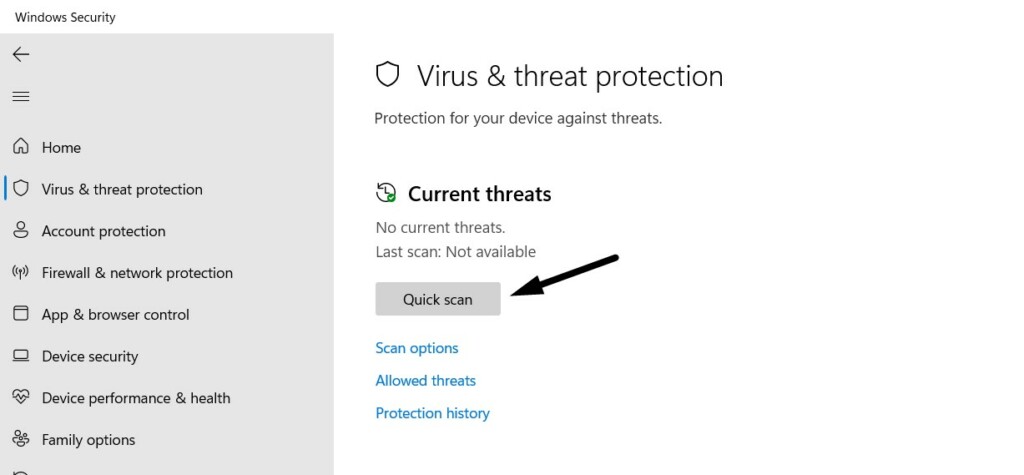
3.Click theQuick scanbutton on the next screen to begin the quick virus scan on the equipment.
5.If the scan finds some malicious files on your PC, follow the on-screen steps to remove them.
Due to this, we suggest yourun the DISM scanon your PC to repair the Windows image.
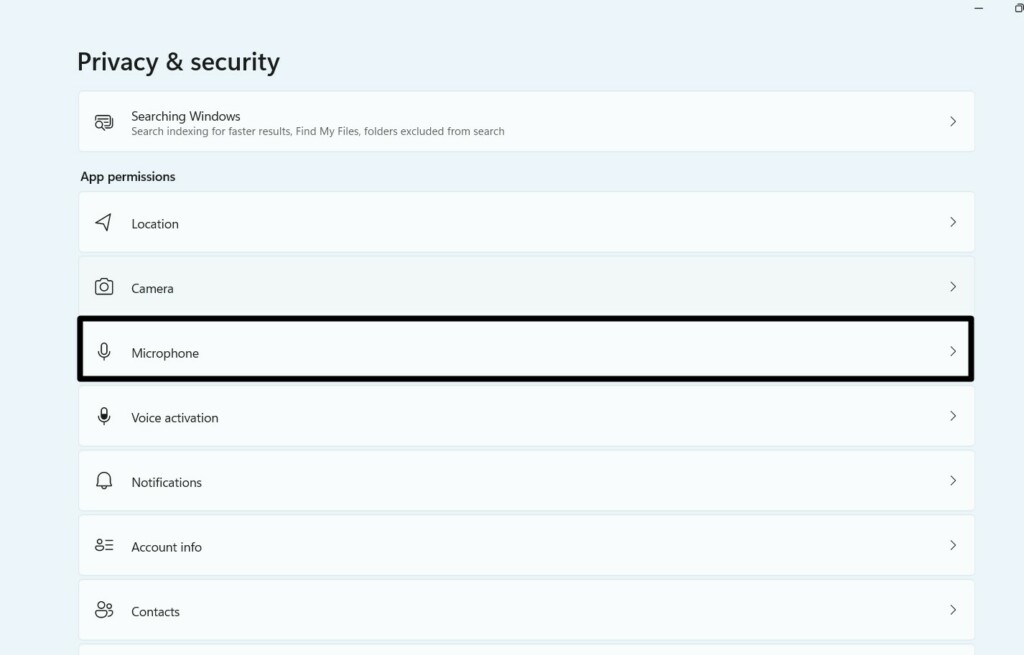
2.Head to theApp permissionssection and click theCameraoption in the same section.
3.In the next window, ensure theCamera accesstoggle is enabled, and search for theSkype app.
4.Ensure the toggle next to theSkype appin theLet apps access your camerasection is turned on.
5.Once done, move back to the previous window, click theMicrophoneoption, and do the same.
This is because its absence could also cause this issue with Skype.

2.Expand theOptional featuressection by clicking on it and clicking theView featuresbutton.
3.Search forMedia Feature Packusing the search box in the box and tick the checkbox next to it.
4.Click theNextbutton at the bottom to install theMedia Feature Packon your Windows 11 PC.
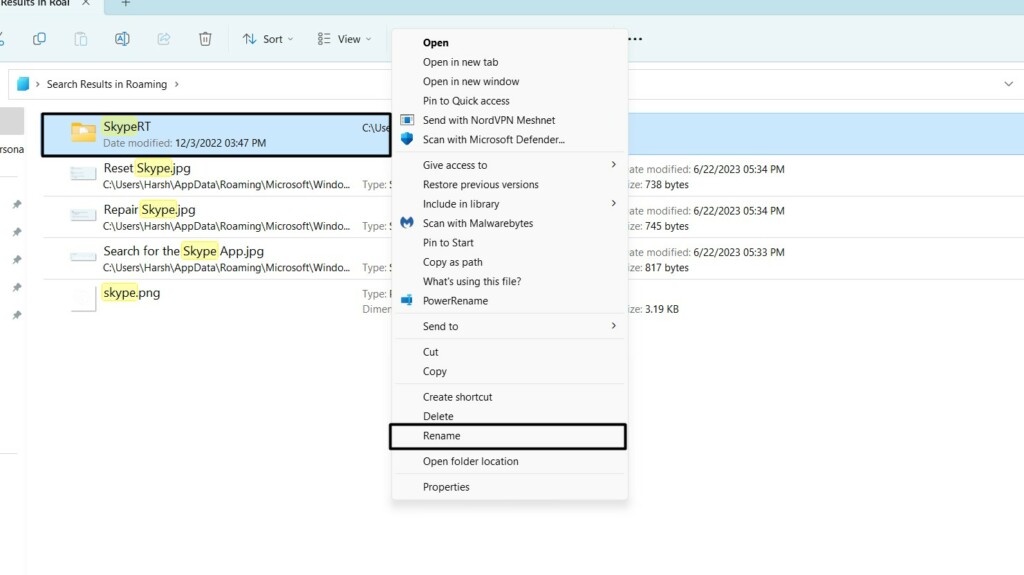
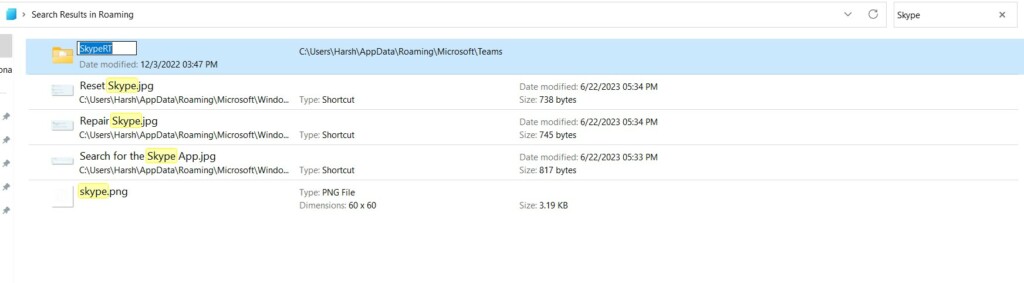
Rename the Skype Data Folder
Some users mentioned thatrenaming the Skype Data foldereasily fixed the issue for them.
This created a new Skype Data folder when they opened Skype on their Windows 11 PC.
As a result, it fixed the Skype not working issue on their Windows 11 PC or computer.
So, try the same and test whether it fixes the issue.
3.In theRoamingfolder, right-clickSkype Data, and selectRenamefrom the context menu.
4.Once done,rename the new folderSkype_2or anything you want to as per your preferences.

5.After implementing the above steps, exit the Safe mode and confirm the issues status.
Reset and Repair Skype
Another possible workaround to fix all the issues with Skypes working isresetting and repairing it.
We first suggest you repair Skype and then reset it to give it a completely fresh start.

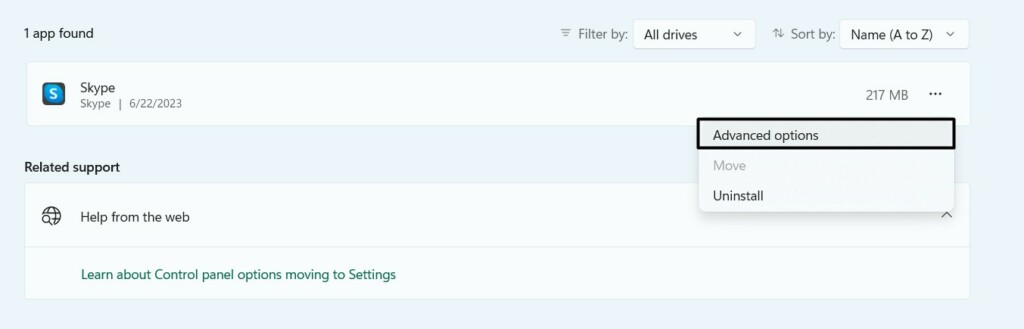
2.Click theInstalled appsoption and then search for theSkype appin the same section.
3.Click thethree dots(…)next to theSkype appand selectAdvanced optionsfrom the menu.
4.Go to theResetsection, and then click theRepairbutton to fix issues with the Skype app.

5.Once the Skype app is repaired, click theResetbutton to clear its data and give it a fresh start.
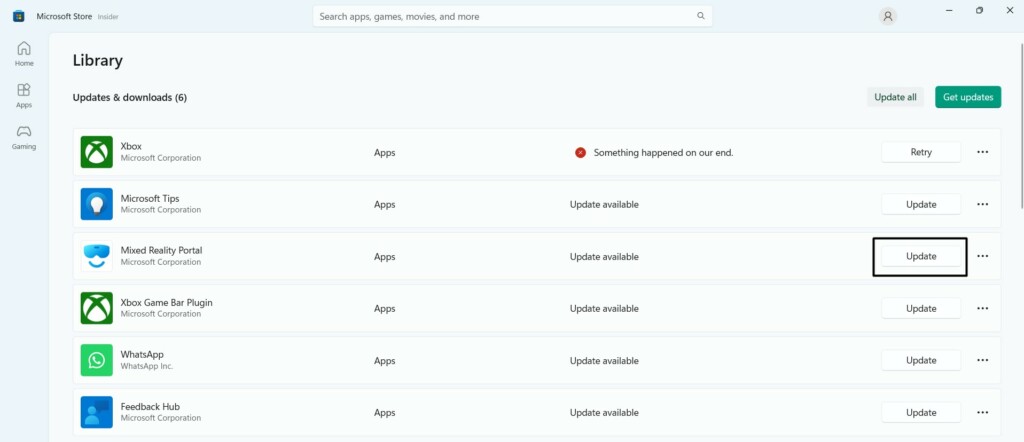
2.Look forSkypein theUpdates & downloadssection and click theUpdatebutton next to it.
3.Once the Skype app is updated, check whether its now opening properly now on your PC.
Reinstall Skype
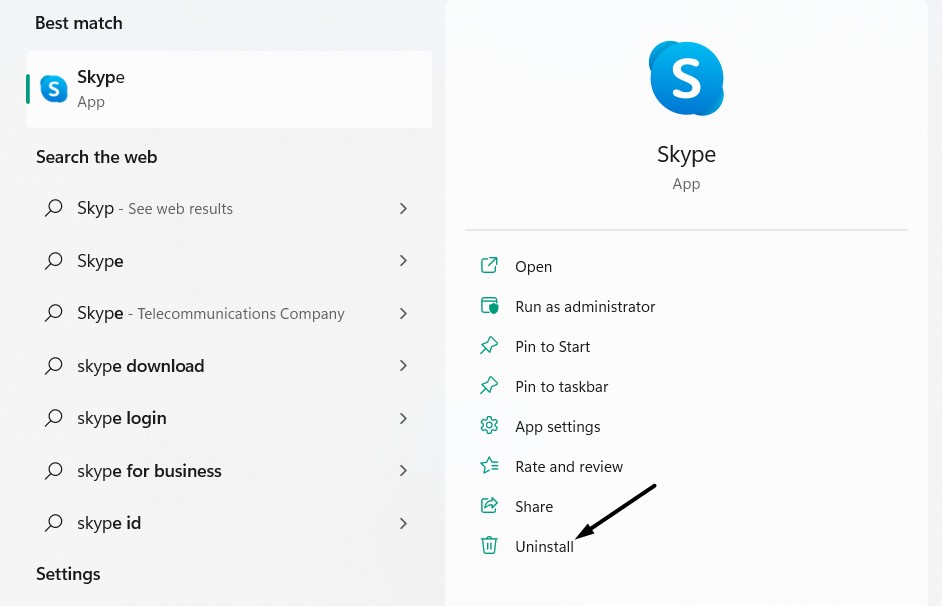
1.Search for theSkype appusing the Windows search and click theUninstallbutton in the results.
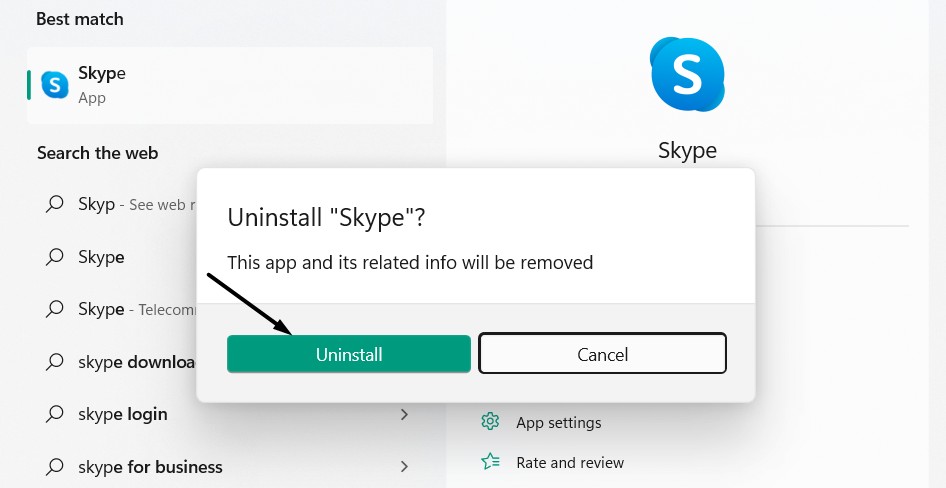
2.Click theUninstallbutton in the next prompt to uninstall the app from your Windows PC.
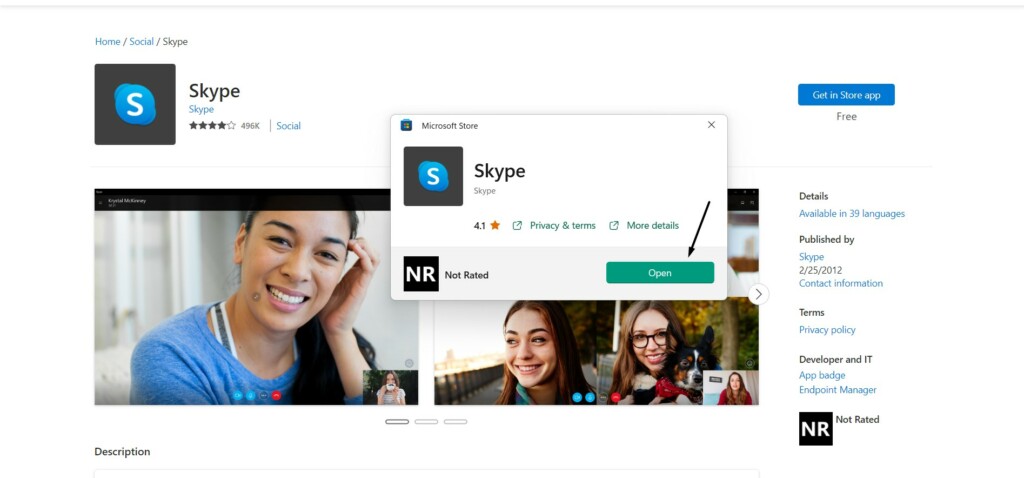
3.Once its uninstalled, clickhereto go to Skypes Microsoft Store page and clickGet in Store app.

4.Click theOpen Microsoft Storebutton in the next prompt and clickGet orInstallto download it.
Hopefully, the Skype not working issue is fixed now on your Windows 11 PC.
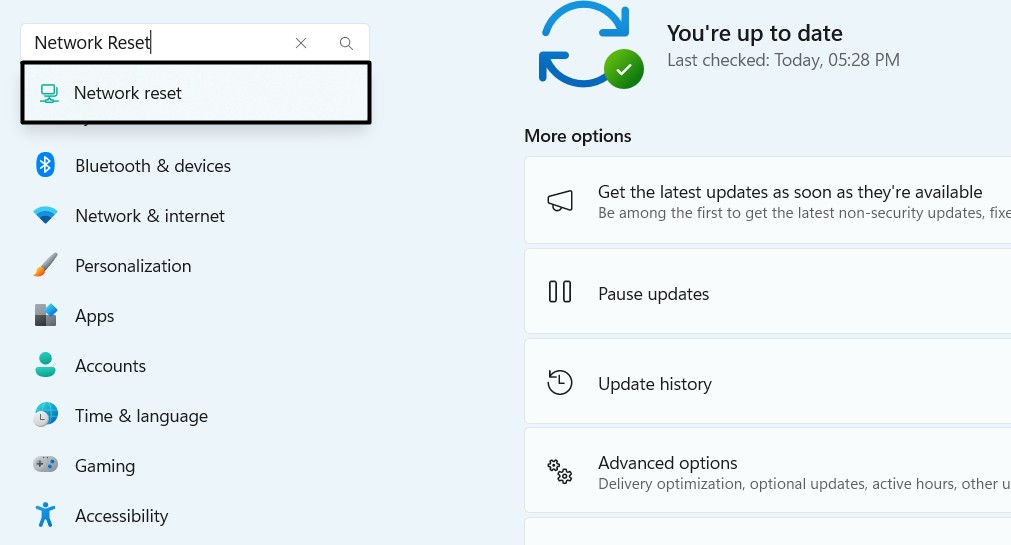
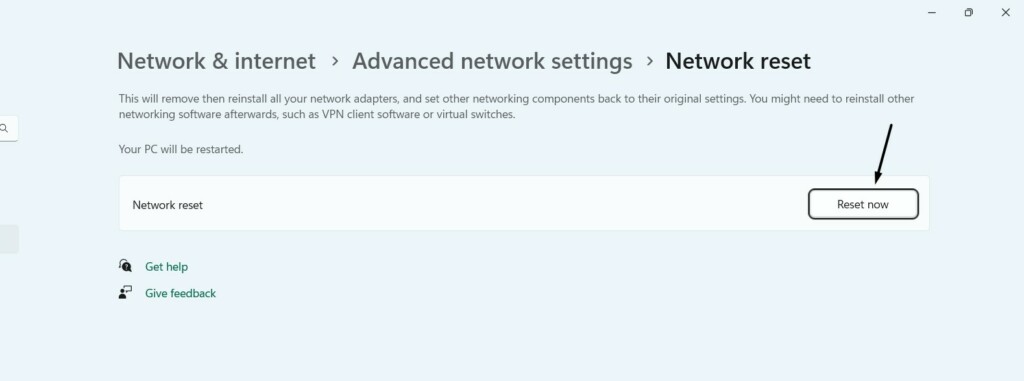
Due to this reason, we suggest youfactory reset your PCs connection configurationsto the default.

2.Click theReset nowbutton next toNetwork resetand then click theYesbutton in the prompt.
Once done, confirm the Skype not working issues status on your Windows 11 PC.
2.Click theCheck for updatesbutton at the top to scan for new Windows updates and install them.

3.If there are new updates to install, click theDownload and Installallbutton to do the same.
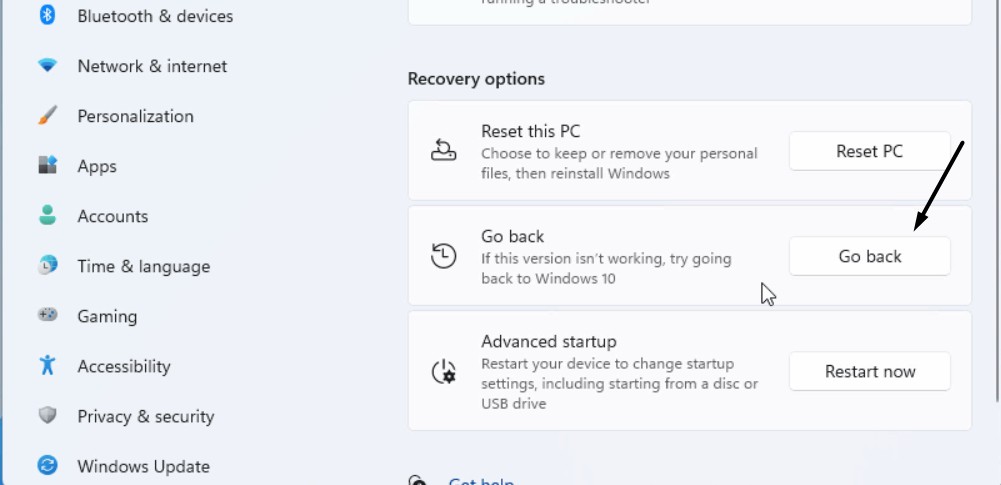
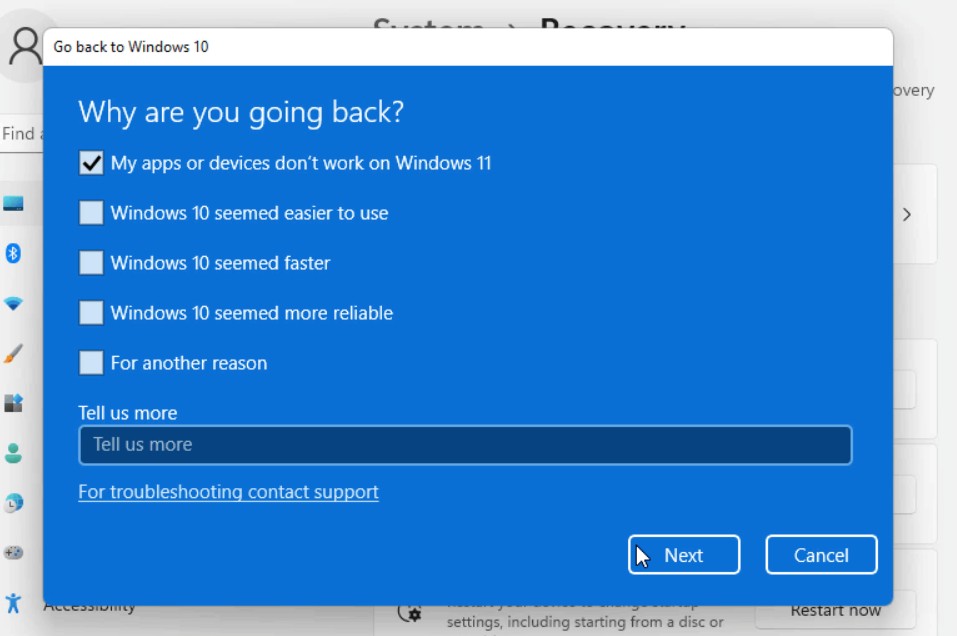
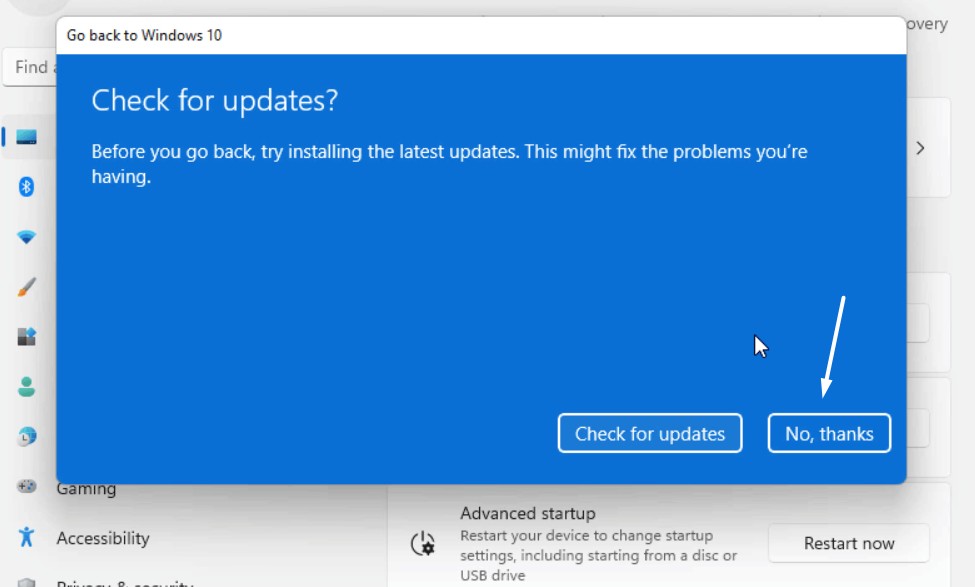
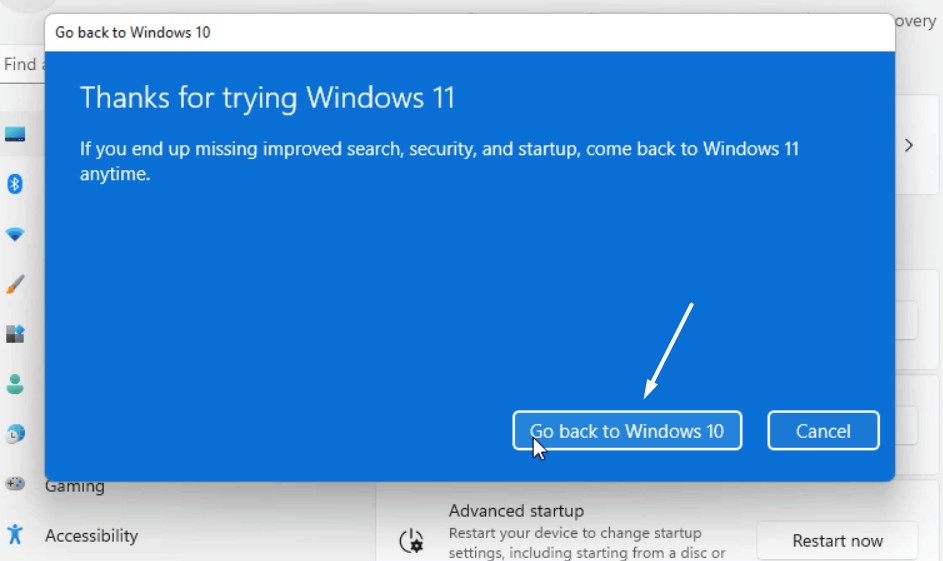
2.In theGo back to Windows 10prompt, select reasons for going back to the previous version.
3.ClickNext, thenNo, thanks, and keep answering the questions until you reach the last question.

4.Lastly, click theGo backto Windows 10button to start the process of going back to Windows 10.
Skypes web version has the same interface and features.
you might clickhereto move to Skypes web version and sign in with your account.

FAQs
Why Skype won’t go in Windows 11?
How Do I Fix Skype Crashing on Windows 11?
If the Skype app is constantly crashing on your Windows 11 PC, tryopening it as an administrator.

If this doesnt help you fix the issue, consider updating or reinstalling it on your PC.
Is Skype Supported on Windows 11?
Yes, Skype works on Windows 11.
Not only does it work on Windows 11, but it also works on some older versions of Windows.
How Do I Update Skype on Windows 11?
you could update the Skype app on your Windows 11 computer from the native Microsoft Store.
How Do I Reset Skype on Windows 11?
If you successfully fixed it, share with us which workaround helped you do so.